
Propagation
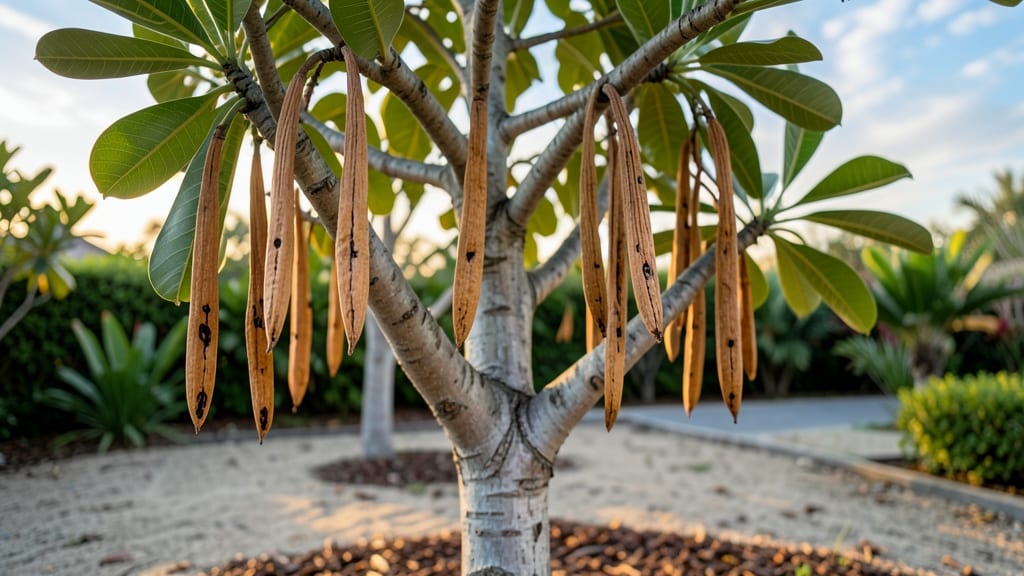
Understanding how to manage seed pods on plumeria 🌺 is the key to growing healthier plants—and avoiding a common gardening frustration.
Plumeria trees reward patient gardeners with stunning blooms, but those seed pods hold the secret to stronger plants next season. Yet, timing and technique matter more than you think—harvest too early or too late, and you risk wasting viable seeds.
In this guide, I’ll walk you through when to harvest those pods for maximum germination success, how to process them properly, and the common mistakes that kill seed growth before it starts.
Whether you’re a seasoned tropical plant enthusiast or just starting with plumerias, these tips will help you turn those pods into thriving new plants—without the guesswork.
When to harvest plumeria seed pods for maximum germination success
Timing is everything when harvesting plumeria seed pods. These pods develop 3 to 5 months after your tree blooms, but rushing or waiting too long can ruin your chances of growing healthy new plants.
The key is watching for visual maturity cues—like color changes and texture shifts—that signal the seeds are ready for collection. Missing this window means lower germination rates or seeds that won’t sprout at all.
Plumeria trees thrive in USDA Zones 10-12, but even within these zones, your local climate plays a role. Coastal areas with higher humidity may need earlier harvesting, while drier inland regions can wait slightly longer.
Understanding these regional differences helps you adjust your timing for the best results. For example, a Florida plumeria might need pods harvested in late summer, while a California-grown tree could wait until early fall.
Visual maturity cues are your best friends. Start by looking for pods that turn from green to brown, a clear sign the seeds inside are maturing. They should also feel dry and papery when touched—if they’re still slightly moist, they’re not ready. Another telltale sign? The pods will split open naturally or feel ready to crack open with gentle pressure. Ignoring these cues can lead to seeds that sprout too early or fail to germinate entirely.
Here’s a quick reference to help you spot the perfect moment:
If you’re in a cooler microclimate within a warm zone, like a high-elevation area, your pods might mature more slowly. Pay extra attention to temperature drops, as even slight chills can stall seed development.
In these cases, extend your harvesting window by 1 to 2 weeks to account for slower drying times. Conversely, if your plumeria is in a hot, low-humidity environment, pods may dry out faster—watch for the papery texture and harvest as soon as it appears.
One common mistake is harvesting pods that are still partially green. These seeds often fail to germinate because they’re not fully mature. To test readiness, gently squeeze a pod—if it feels squishy or moist, wait a few more days.
Patience here pays off with higher germination rates. I once harvested a batch of half-ripe pods and only 10% sprouted, compared to a 90% success rate with fully mature pods the following season.
Regional climate also affects seed viability. In tropical regions, like Hawaii or Puerto Rico, plumeria seed pods mature year-round, but the best time to harvest is during the dry season to reduce fungal risks.
In subtropical zones, such as Southern California or Florida, aim for late summer to early fall when temperatures are warm but humidity starts to drop. This balance helps prevent mold and ensures seeds stay dry during storage.
Don’t overlook the role of pod location on the tree. Pods that form on younger branches often mature faster than those on older wood.
If you’re dealing with a large plumeria, prioritize harvesting pods from the outer branches first, as these are typically more exposed to sunlight and dry out quicker. This targeted approach saves time and ensures you’re collecting the most viable seeds.
Once you’ve identified the perfect pods, act quickly. Use a sterilized knife or pruners to cut the pods from the stem, leaving a small portion attached to avoid damaging the tree. Place them in a paper bag to allow airflow while preventing moisture buildup. Store the bag in a cool
Step-by-step guide to harvesting and processing plumeria seed pods
Now that you’ve identified your perfectly mature plumeria seed pods, it’s time to process them properly to maximize germination success. The key steps—harvesting, opening, drying, and storing—each play a critical role in preserving seed viability.
Skipping any step or rushing through them can lead to mold, premature sprouting, or seeds that simply won’t grow. I’ve learned this the hard way after losing entire batches of seeds due to improper drying techniques, so let’s get this right from the start.
Once you’ve harvested your pods, the next critical step is extracting the seeds while maintaining their integrity. Start by placing the pods in a well-ventilated area for 24 hours to ensure they’re completely dry. This prevents moisture from causing mold during storage.
Use a sterilized knife or small pruning shears to carefully slice open each pod lengthwise—never force it open, as this can damage the seeds inside. For larger batches, wearing gloves is a good idea to avoid skin oils contaminating the seeds.
I recommend working in a clean workspace, like a kitchen counter or dedicated seed-processing area, to minimize dust and debris.
- 1 Harvest the pods when fully brown and papery, using sterilized pruners to avoid damaging the tree. Place pods in a paper bag for airflow.
- 2 Dry the pods in a shady, well-ventilated area for 24-48 hours. This prevents mold and ensures seeds are fully mature. Avoid direct sunlight, which can over-dry them.
- 3 Open the pods carefully with a sterilized knife, splitting them lengthwise. Remove seeds and discard any that appear shriveled or discolored. Wear gloves to avoid contamination.
- 4 Dry the seeds on a paper towel in a single layer for 3-5 days. Flip them daily to ensure even drying. Store in a cool, dry place until ready to plant.
- 5 Store seeds in an airtight container with a desiccant packet to prevent moisture buildup. Label with the harvest date—viable seeds last up to 6 months if stored properly.
After extracting the seeds, drying them properly is non-negotiable. Spread them out in a single layer on a paper towel or clean screen in a shady, dry location. Avoid direct sunlight, which can over-dry the seeds and reduce their viability.
Flip them daily to ensure even airflow and prevent mold. I like to use a small mesh bag suspended in a cool, dark closet for the final drying phase—this mimics the natural conditions that plumeria seeds thrive in.
Once fully dry, they should feel lightweight and brittle to the touch, with no moisture remaining.
Storing your seeds correctly is just as important as drying them. Place them in an airtight container, such as a glass jar or resealable plastic bag, and add a silica gel packet or two to absorb any residual moisture.
Label the container with the harvest date, as plumeria seeds lose viability over time—ideally, you’ll plant them within 3 to 6 months for the best results. Store the container in a cool, dark place, like a pantry or basement, where temperatures stay consistent.
I’ve found that seeds stored in a refrigerator (not freezer) can last up to 12 months, though germination rates may drop slightly after 6 months.
One final tip: Test a few seeds before storing the rest. Place 3-5 seeds in a small container with moist paper towels and cover with plastic wrap. Check for sprouting in 7 to 14 days—this gives you a clear indication of seed viability.
If they sprout well, your storage method is working. If not, you may need to adjust drying times or storage conditions. This simple test saved me from storing dozens of non-viable seeds one season!
With these steps, you’ll be ready to plant your plumeria seeds with confidence, knowing they’ve been handled with care. The next challenge? Germinating them successfully—but that’s a story for another guide! 🌱