
Lawn
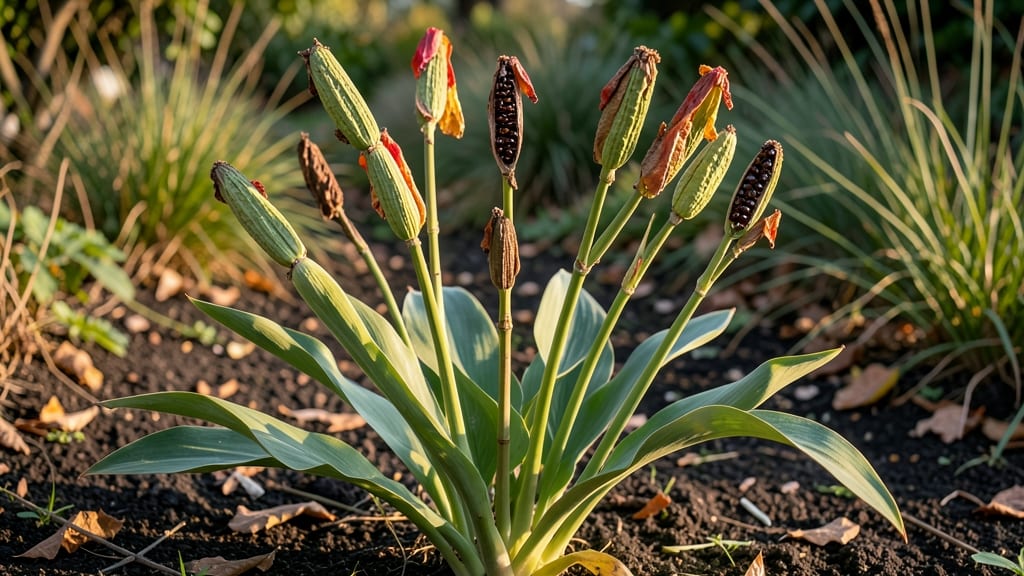
Extracting canna lily seeds without twisting the pods saves time and preserves seed viability. 🌿 I learned the hard way that forcing open those tough seed cases often crushes the seeds inside—until I discovered a simple, twist-free method that works every time.
The trick starts with patience: wait until the pods turn from green to brown and begin splitting naturally. Once they're dry and papery, gently squeeze the sides until they open like a clamshell, revealing rows of plump, dark seeds. No prying, no frustration—just clean extraction.
You'll end up with 50-100 seeds per pod, depending on the variety, ready for immediate planting or storage. The seeds stay viable for 2-3 years when kept cool and dry, so you can propagate your favorite cannas for seasons to come without buying new plants.
This method also cuts down on waste—no discarded pods, no broken seeds. Perfect for gardeners who want to preserve heirloom varieties or share seeds with fellow canna enthusiasts. Here's how to do it right the first time.
📚 In This Guide
- What you need
- Instructions
- Tips and common mistakes
- Wrapping up and next steps
What you need
- ● Mature canna lily seed pods: 3–5 fully developed pods (brown, dry, and slightly papery—avoid green or soft ones!)
- ● Sharp pruning shears or scissors: For cleanly harvesting pods without damaging the plant.
- ● Brown paper bags or breathable mesh bags: 1–2 bags (to store pods while they dry further).
- ● Tweezers or small tongs: For gently extracting seeds from pods (precision is key!).
- ● Paper towels or parchment paper: To line a tray for seed drying.
- ● Small bowls or egg cartons: For sorting and storing clean seeds.
- ● Labeling markers & tags: To mark seed varieties (e.g., "Canna ‘Striped’ – 2024").
- ● Spray bottle with water: For lightly misting pods if they’re stubbornly dry.
- ● Gloves: If you’re sensitive to plant fibers or sap.
- ● Magnifying glass: For inspecting seeds for pests or damage.
- ● Seed viability test kit: To check germination rates before planting.
- ● Air-tight containers with silica gel: For long-term seed storage (5+ years).
- ● Notebook: To log pod harvest dates, seed counts, and germination notes.
Step-by-Step instructions for extracting canna lily seeds without twisting pods
Here's how to save seeds from canna lilies while keeping the process simple and mess-free.
🌿 Step 1: Harvest Mature Seed Pods at the Right Time
Wait until the seed pods turn a deep brown and begin to split open naturally—this usually happens in late fall after the first frost. You'll know they're ready when the outer skin feels dry and papery to the touch. Gently twist the pod open by hand (no tools needed) and let the seeds spill out onto a clean surface.
If you harvest too early, the seeds won't be fully mature and may not germinate. I like to check pods every few days in late autumn, as they ripen unevenly. Place them in a paper bag for a day or two to finish drying if they're still slightly damp.
💧 Step 2: Clean and Dry Seeds Thoroughly
Spread the seeds on a flat tray or paper towel and let them air-dry in a warm, dry spot for 3-5 days. You want them completely dry—if any seeds feel sticky or damp, leave them out longer. This prevents mold and ensures good germination rates.
Use a fine mesh strainer or sieve to remove any chaff or debris that clings to the seeds. I run my fingers through them gently to separate any lingering bits. Store the cleaned seeds in a labeled paper envelope in a cool, dark place until ready to plant.
✂️ Step 3: Store Seeds Properly for Long-Term Viability
Place the dried seeds in an envelope or small paper bag and seal it with a twist tie or rubber band. Label it with the variety name and the year harvested. Store the envelope in a cool, dry place—a seed catalog or kitchen cabinet works well.
Canna lily seeds stay viable for 2-3 years if stored properly, but I've found they germinate best when planted within the first year. The key is keeping them dry—moisture is the enemy of seed longevity.
🌱 Step 4: Prepare Seeds for Planting (Optional Soaking)
Before planting, soak the seeds in lukewarm water for 12-24 hours to soften the tough outer coating. This step speeds up germination and helps tender seedlings break through more easily. I use a shallow dish or jar and cover it loosely with a lid or plastic wrap to retain moisture.
After soaking, plant the seeds ½ inch deep in well-draining soil. Keep the soil consistently moist but not soggy—canna lilies hate waterlogged roots. Germination usually takes 2-4 weeks, depending on temperature and soil conditions.
Tips & tricks for perfect canna lily seed extraction
Saving canna lily seeds doesn't have to be tricky—these simple tricks will help you avoid common pitfalls and maximize your seed yield.
The Right Time is Everything: Harvesting too early is the biggest mistake I see! Wait until pods are deep brown and beginning to split naturally—this usually happens after the first frost. The pods should feel dry and papery to the touch, not firm. I've learned the hard way that green pods contain immature seeds that won't germinate. If you're unsure, check pods every few days in late autumn—they ripen unevenly.
Drying Strategy: For that critical 3-5 day drying period in Step 2, place seeds on a tray in a warm, dry spot with good airflow. I like to use a mesh screen over a baking rack to allow air circulation on all sides. If your kitchen feels damp, try a sunny windowsill or even a dehydrator on low heat. The goal is complete dryness—any lingering moisture will cause mold and ruin your seeds. Test by touching a seed: if it feels sticky, it needs more time.
Storage Wisdom: That cool, dry place for storage? Think beyond just your kitchen cabinet. A seed catalog or even the back of your freezer (not the fridge) works perfectly. I've had great success storing seeds in glass jars with silica gel packets to absorb any potential moisture. Labeling with the variety name and year is crucial—canna lily seeds stay viable for 2-3 years, but they germinate best when planted within the first year.
Germination Boost: For that optional 12-24 hour soaking in Step 4, lukewarm water is key—too hot and you'll damage the seeds, too cold and it won't soften the tough outer coating effectively. I like to use a shallow dish with just enough water to cover the seeds, then cover loosely with plastic wrap. This creates a humid environment that speeds up the softening process while preventing waterlogging. After soaking, plant immediately—they'll start germinating right away!
Pro Tips for Canna Lily Seed Pods
- Saving canna lily seeds doesn't have to be tricky—these simple tricks will help you avoid common pitfalls and maximize your seed yield.
- The Right Time is Everything: Harvesting too early is the biggest mistake I see!
- Drying Strategy: For that critical 3-5 day drying period in Step 2, place seeds on a tray in a warm, dry spot with good airflow.
Frequently asked questions
about canna lily seed pods—here’s what you need to know before diving into zero-waste seed saving!When do canna lily seed pods form?
Canna lily seed pods typically appear in late summer to early fall (August–October, depending on your climate). Look for swollen, papery pods at the base of the plant’s leaves. Pro tip: Harvest them before they split open to avoid messy seed scatter!
How long does it take for seed pods to mature?
Once pollinated, canna lily seed pods take 6–8 weeks to fully mature. You’ll know they’re ready when the pods turn brown and begin to crack open. Don’t wait too long! Overripe pods release seeds easily, making collection tricky.
Can I save seeds from store-bought canna lilies?
Yes, but with a caveat: store-bought plants may not produce true-to-type seeds if they’re hybrids. For consistent results, save seeds from open-pollinated varieties or grow from seed yourself. If you’re unsure, ask the nursery!
What if my seed pods won’t open naturally?
If pods stay stubbornly closed, try placing them in a paper bag for a few days—they’ll release seeds on their own. Alternatively, gently squeeze the pod over a tray to coax out the seeds. Patience pays off!
Are canna lily seeds toxic to birds or wildlife?
Nope! Canna lily seeds are non-toxic and safe for birds and small wildlife. In fact, they’re a natural food source once the pods split open. Just avoid over-collecting in wild areas to support local ecosystems.
Wrapping up and next steps
Canna lily seed pods offer a simple yet rewarding way to propagate these stunning plants while embracing zero-waste gardening. With just a few tools and a little patience, you can extract seeds effortlessly—no twisting required!
Whether you're a seasoned gardener or a curious beginner, this method makes seed saving fun and sustainable.
Ready to grow your garden with confidence? Try this twist-free technique with your next canna lily harvest and watch your plants thrive year after year. 🌱✨ Start saving seeds today!